- 19 August, 2020


Using Microsoft Power BI with AllegroGraph
There are multiple methods to integrate AllegroGraph SPARQL results into Microsoft Power BI. In this document we describe two best practices to automate queries and refresh results if you have a production AllegroGraph database with new streaming data:
The first method uses Python scripts to feed Power BI. The second method issues SPARQL queries directly from Power BI using POST requests.
Method 1: Python Script:
Assuming you know Python and have it installed locally, this is definitely the easiest way to incorporate SPARQL results into Power BI. The basic idea of the method is as follows: First, the Python script enables a connection to your desired AllegroGraph repository. Then we utilize AllegroGraph’s Python API within our script to run a SPARQL query and return it as a Pandas dataframe. When running this script within Power BI Desktop, the Python scripting service recognizes all unique dataframes created, and allows you to import the dataframe into Power BI as a table, which can then be used to create visualizations.
Requirements:
- You must have the AllegroGraph Python API installed. If you do not, installation instructions are here: https://franz.com/agraph/support/documentation/current/python/install.html
- Python scripting must be enabled in Power BI Desktop. Instructions to do so are here: https://docs.microsoft.com/en-us/power-bi/connect-data/desktop-python-scripts
a) As mentioned in the article, pandas and matplotlib must be installed. This can be done with ‘pip install pandas’ and ‘pip install matplotlib’ in your terminal.
The Process:
Once these requirements have been met, create a Python file with whatever script editor you usually use. The following code will create a connection to your desired repository. For this example, we will be using the Kennedy dataset that is available with the AllegroGraph distribution (See the ‘Tutorial’ directory). Load the Kennedy.ntriples file into your running AllegroGraph. (Replace the ‘****’ in the code with your corresponding username and password.)
#the necessary imports
import os

from franz.openrdf.connect import ag_connect

from franz.openrdf.query.query import QueryLanguage

import pandas as pd
#connect to your agraph repository
def setup_env_var(var_name, value, description):

os.environ[var_name] = value

print("{}: {}".format(description, value))

setup_env_var('AGRAPH_HOST', 'localhost', 'Hostname')

setup_env_var('AGRAPH_PORT', '10035', 'Port')

setup_env_var('AGRAPH_USER', '****', 'Username')

setup_env_var('AGRAPH_PASSWORD', '****', 'Password')

conn = ag_connect('kennedy', create=False, clear=False)
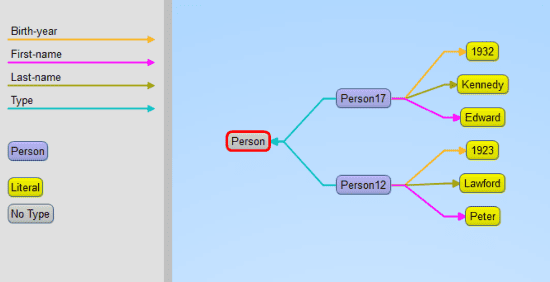
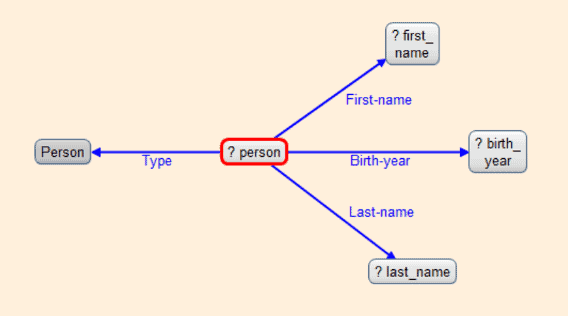
2. We then want to create a query. For this example, we will first show what our data looks like, what the visual query of the information is, and what the written query looks like. With the following query we want every person’s first and last names, as well as their birth years. Here is a small portion of the data visualized in Gruff, and then the visualization of the query:
3. Then add the written query to the python script as a variable string (we added an additional line to the query to sort on birth year). Next use the API functionality to simply execute the query and turn the results into a pandas dataframe.
query = """select ?person ?first_name ?last_name ?birth_year where
{ ?person <http://www.franz.com/simple#first-name> ?first_name ;
          <http://www.franz.com/simple#birth-year> ?birth_year ;
          rdf:type <http://www.franz.com/simple#person> ;
          <http://www.franz.com/simple#last-name> ?last_name . }
order by desc(?birth_year)"""

with conn.executeTupleQuery(query) as result:
   df = result.toPandas()
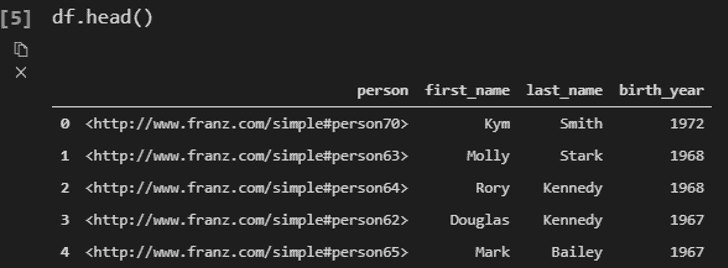
When looking at the result, we see that we have a DataFrame!
4. Now we will use this script in Power BI. When in Power BI Desktop, go to ‘Get Data’ and look for the python script option. Then simply copy and paste your entire script into the text box, and run the script. In this case, our output looks like this:
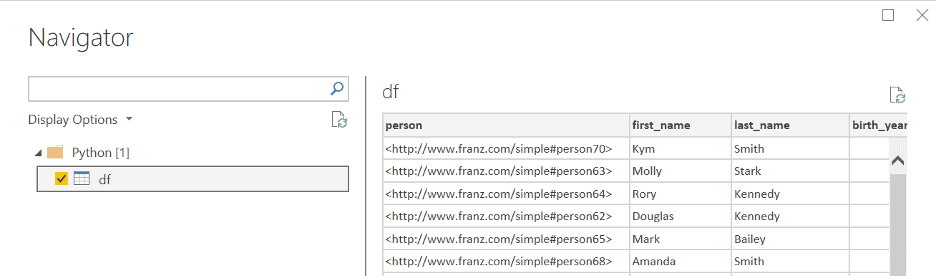
5. Next simply ‘Load’ the data, and then you can use the Power BI Desktop interface to create whatever visualizations you want! If you do have a lot of additional operations to perform on your dataframe, we recommend doing these in your python script.
Method 2: POST Request:
For the SPARQL query via POST requests to work you need to url-encode the query. Every modern programming language will support that, but in our example we will be using Python again. This method is better for when you do not have python locally installed or prefer a different programming language.
It is possible to send a GET request from Power BI, but once the results from the query reach a certain size, a POST request is required, which is confusing to do within the Power BI Desktop interface. The following steps will show you how to do SPARQL Queries using POST requests. It looks a bit odd but it works well.
The Process:
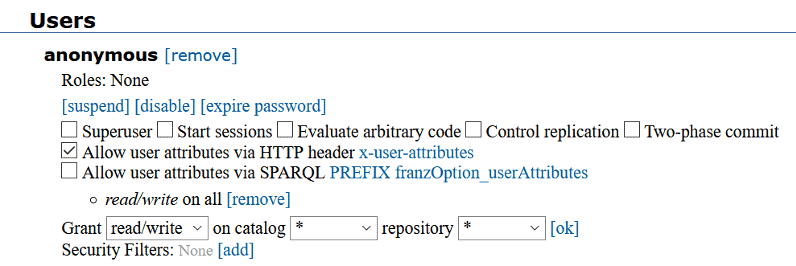
1. In your AG WebView create an ‘anonymous’ user. (Go to admin -> Users -> [add a user] -> and add ‘anonymous’ as username without adding a password). You can use these settings:
2. Go to your desired repository in WebView and Click on ‘Queries’ -> ‘New’
3. Write a simple SPARQL query, and run it to make sure you get the correct response back.
4. In python create the following script: (Assuming your AllegroGraph is on your localhost port 10035 and your repo is called ‘kennedy’)
import urllib

def CreatePOSTquery(query):
    start = "http://anonymous:@localhost:10035/repositories/kennedy?queryLn=SPARQL&limit=1000&infer=false&returnQueryMetadata=false&checkVariables=false&query="
    response = start + urllib.parse.quote(query)
    return response
This function url-encodes the query and attaches it to the POST request. Replace the ‘localhost:10035’ and ‘kennedy’ strings in the start variable with your corresponding data. Then, using the same query as our previous example, we create our url-encoded POST query:
query = """select ?person ?first_name ?last_name ?birth_year where
{ ?person <http://www.franz.com/simple#first-name> ?first_name ;
          <http://www.franz.com/simple#birth-year> ?birth_year ;
          rdf:type <http://www.franz.com/simple#person> ;
          <http://www.franz.com/simple#last-name> ?last_name . }
order by desc(?birth_year)"""

result = CreatePOSTquery(query)
print(result)
This gives us the following result:

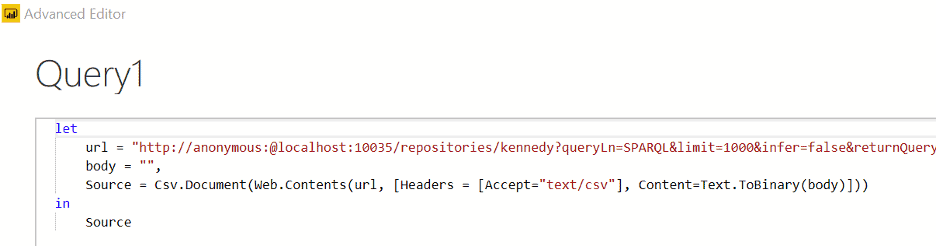
5. Within Power BI Desktop we go to ‘Get data’ and create a ‘Blank query’ and go into the ‘Advanced Editor’ window. Using the following format we will get our desired results (please note that due to the length of the url-encoded request, it did not all fit in the image. Copy and pasting into the url field works fine. The ‘url’ variable needs to be in quotes and have a comma at the end):
We see the following results:
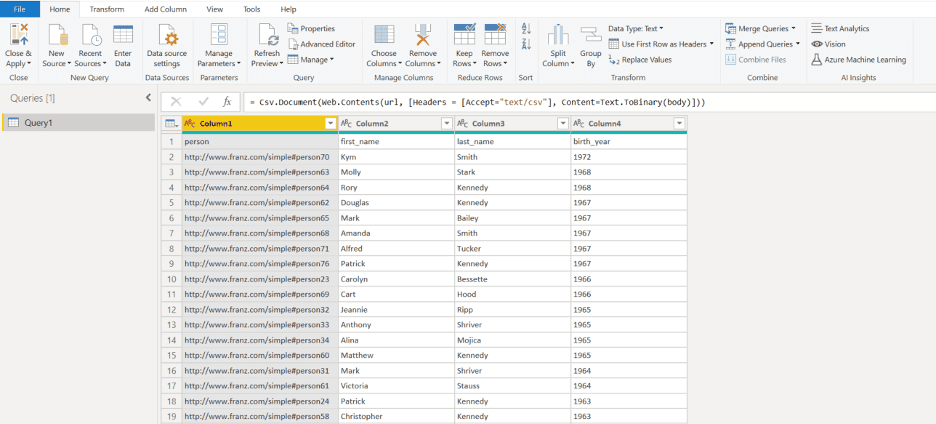
6. One last step is to turn the top row into the column names, which can be achieved by pressing the ‘Use first row as headers’: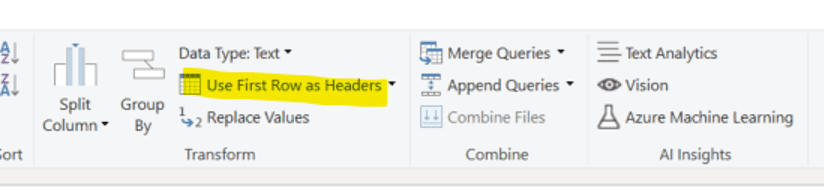
The best part about both of these methods is that once the query has been created, Power BI can refresh the visuals using the same queries if your data changed. This can be achieved by scheduling refreshes within the Power BI Desktop interface (https://docs.microsoft.com/en-us/power-bi/connect-data/refresh-data#configure-scheduled-refresh)
Please send any questions or issues to: [email protected]